Nature handmade flower arrangements

 Hi all, After long time i reached my home sweet home (Kerala)
..............Well, here it is! I finally finished my handmade Nature with handmade flowers bouquet. I had loads of fun..... but what a relief that it is over. At times, I was worried I was going to have to tear it apart and start all over. 


 So, I am not going to bore you with every detail. Just going to give you the basics. 
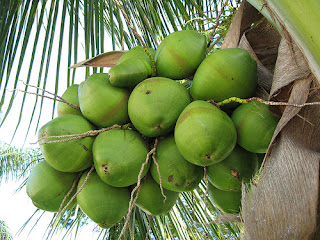
Each flowers is a collection of dried coconut palms, coconut flowers, and seeds. For finishing touch, i used warmish. Here i used 1 mm copper wire for tide the flowers, and touch with brown acrylic paint. It takes almost 2 weeks to complete, because i have to wait my coconut tree parts want to dry, and one more important item is Guava tree branch....Those flowers are tide on this tree branches ( after removing skin of branch ). 


Some pics of coconut palm flower


I hope you like my creation,
Thanks for stopping by!

BGC#72 - ANYTHING GOES
LESSology Challenge #52: Beachfront Property


I just addicted in embossing powders

Good Morning Everyone,
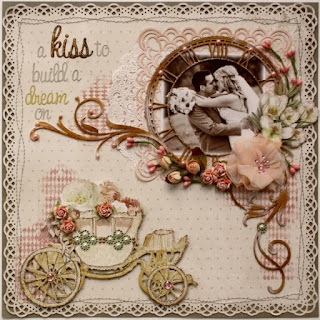
  Here is another layout for Lovely marriage couple. I'm giving as a gift to my nephew and his new bride. I really loved this photo of them. I wanted the page to have a lots of golden work so I use a lots of embossing powders and gave them a Gorgeous look. For this layout I used A lot of Rangers golden embossing powder and Lindy's gang embossing powders on die cut chippies. Corner of on the frame also used rangers golden embossing powder


This was created as part of a challenge using a Embossing powders and inspiration from Gabriella's art work from Such a pretty mess blog. She is a most amazing artist and pushed me to try some die cut chippies. Check her design


Materials used on this layout: 
1  12 X 12 MDF frame
2  Tim Holtz Wallflower paper
3  Chipboard die cuts from local & online store
4  Embossing Powders
5  Mod Podge 
6  Martha stewart Punch set
7  Glue Gun
8  Rose buds and blossoms
9  Rangers Walnut stain distress ink
10 Any type of flourish and dot design stamp
11 Heat embossing tool
12 Golden pollens

Here are some close-up shots of my page....


I hope you like my creation
 Thanks for stopping by!

Entering this to the following challenges
 Scrap Craft Inspiration "Colours of Autumn"

Cute Bottle Couple

Hi all,
 Today I'll be showing you how to make mixed media art from recycled bottles and by using things you already have at home. I started my mixed media work by experimenting with the bottle top.


Vintage Shade .......:-)


This mixed media bottle art pieces I made using Silver metallic powder, masking tape, chipboard piece, light color ribbon, gum pearls, lace, Heavy gesso, tacky glue, black velvet cloth and Juice bottle.


1. Clean the bottle and Close the top of bottle with chipboard and masking tape


2. Apply gesso........two coat. One bottle i used to cover the full part of bottle, 


3. By using Mode podge i apply the silver metallic powder on bottle. Heat it with craft tool
4. And i covered the bottles with lace and velvet cloth. 
5. Decorate bottle with blossom and ribbon

I enjoy making mixed media art because it allows me to use all the really fun, interesting and old things I find at my shelf. Here i design the combination of White, Black, & Silver....... If you want, you can make with Cream, Black and Gold.

Here is some close ups


I hope you have enjoyed this creation. It was created with love for cute couples.......
Thank you for stopping by

Entering this to the following challenge

Presious Moments

Hello Everyone,
I am just loving the mood boards over at Scrap Around The World. I've recently (6 month b4 ) come across the SATW monthly challenge, and I just fell in love with the mood board inspiration pieces. I was first attracted to the rainbow color and then the colorful feather of parrot. Amazing and beautiful.....
Here is my tribute to my best Friend and her cute daughter


Initially I thought of doing only colored layout, but didn't feel it would go with my photo, so i decide to add some stickers and ended up going with the colorful feather for inspiration. Here i used shabby chic resin angel wings from Original collection

I decided to use a photo of my friend's daughter who happened to be dressed in these colors for casual day at home..
Isn't it gorgeous??

some closeup pics  


Supplies used on this layout
10 X 12 Canvas
Acrylic Paints - Spring green, Lilac, Sky blue, Olive Lemon yellow, Golden yellow,                              Cherry red, Deep rose, Teal blast, Flesh tint
Lindy's Embossing powder - Scotch Broom Yellow & Cosmic Pink
Angel wings resin Emblisments
G45 Precious Memories paper collection
Prima Heavy Gesso
Crafter workshopers Stencils
Gum pearls, Stickers & Blossoms


Anyway, here is my interpretation - not my usual style but I was inspired by the colours and childhood feel
Hope you like my project. Thank you for stopping by


Garden View

Hello my dear Craft lovers,
 Today i decided to create a small frame of house........its like small portion of window side with garden..........so i need some decoration items, like windows, pots, columns, rose buds etc........,
Here i used 6 X 9 MDF tray, Dust attic chippies and the Graphic 45 French Country paper. 

Step one - tray decoration,
 2 coat of ( Finnabair Heavy )Gesso on corner of tray. Then i add ( Finnabair Clear Crackle ) texture paste on top of gesso. Then gluing on tray with papers, here i used Graphic 45 8 x 8 French Country papers.


 Step two - Laser cut coloring
 I have altered window and corner chipboard by heat embossing with Lindy's stamp gang embossing powder and Ranger gold embossing powder. For pots and columns chippies, i used metallic bronzes ( fabrica cone liner) and Walnut stain distress ink.


Dust attic chipboards


Step three - Stencil work
 I used prima flourish stencil on corner side and crafter's workshops brick stencil......after drying all i used some fabrica acrylic pearl colors ( gray, shaded blue) and lindy's spray for the finishing ......

After all this, gluing chippies, cutout flowers ,rose buds on the tray

I used chipboard to back of windows for layering pop-ups. The chipboard gives the layering more body. The paper edges and corner of tray were inked with Ranger's vintage Distress Ink.

here is some close ups


Lindy's Product used on this project


I hope you like my creation,
Thanks for stopping by!


Entering this to the following challenges

Dusty attic October Mood Board