My 1st handmade card

Hi everyone! 
Today,today I have a mini art to share with you for Lulupu Recipe challenge, its very interesting challenge, so i set out to make a handmade card and wanted them to be clean and simple. They needed to be simple and clean in design and easy to assemble. A few weeks back I planed to make this card to my husband for our wedding anniversary. I was short on time, so I just had to put something together in an hour or so, and no ideas or anything. 


So I quickly decided to go for a small card, approx. A6 size. Started with a pretty plane base of natural color card stock for the card, with scalloped edges around a soft pattern paper ( Prima paper 6X6 ) as background and just add embellishments randomly and quickly as it all came together. 


Here is how the front of the card came out;

For the embellishments, I added six flowers, cutting die leaves, net type cloth and small card piece from the card-stock and stamped "me and you what a team" on it. I then added a 3D Sticker for pop up the stamped image as well, I glued rose on the left and right top corner with leaves. 

Have a WONDERFUL week my sweet visitors, and I hope to see you all back again soon! Hope you liked my today's share.

So for my project, here's the recipe I have used:
2 - Patterned Papers
0 - 
Washi Tape
1 - Stamp
6 - Rose flowers 

3 Fold Album

 I'm back with another project, no paint, no mediums....only paper craft. I come up to you my latest creation 3 fold photo Album. 


A photo album always helps to memorize the very enjoyable & delightful moments. You just need to capture one or more photos & then after developing these images you can store these pictures into albums. Mostly for one picture a photo frame is preferable while for more than two pictures you can use a photo album. 


 If you are searching for the modern or different from others and contemporary designs of handmade photo album then you are on the right place, because today on this page I am going to discuss the all about how you can prepare a very beautiful picture album at home by using various craft items. 


Have a look at this handmade photo album,This album is presented without photos, usually 11 mini photos can add. For making this style of album the things which required are hard papers or chipboard sheet (for base) for decoration you can take colorful papers, printed papers, plain papers etc, here i used Blue fern studio pattern paper set "SANCTUARY". Glue (for pasting), scissors (for cutting), beads..lace...paper flowers...metal charms...laser cut chipboard....stamp image (for decoration). For binding not required any thread, you can see my previous post here


Cut sheets into 3 equal A5 size, during cutting paper you must keep the size of photos into your mind.  After gluing the base papers ( here brown color) use mode podge on papers, mainly on edges, And make it design as pockets, flap opens, pick up tags ......with embellished blossoms, metal charms, die cuts.  

1st page is a fold out page, holding 4 photos.

2nd page is a pocket page, and contains photo holding tags. 


  3rd page can hold one photo and 4th page is made for pop up photos.


  I do hope you have enjoyed seeing my 3 fold Album. I hope I have inspired you to try this simple 3 fold album for yourself. It is easy to work and its not that much difficult to make, even i don't have much experience making albums. This is the 3rd one. 


Thank you so much for stopping by and visiting my blog.

 Do enjoy the rest of your day.

Take care and God Bless. 
I am entering to


Dream

Welcome back, today I have a project to share with you for Dusty Attic mood board challenge. I am still loving creating mixed media on canvases...This canvas combines two of my Faves, Simmers mists & Dusty Attic chippies! I had fun creating this canvas, it was nice to just experiment and play, I am soo happy with the results too!! 

Its 5 X 9 canvas


Here i made a dimensional part, by cutting center of the canvas. And add rectangle card stock box.  


  This Dusty attic chippies... Corner and Fly Birds were perfect for this piece! I love this Butterfly chippies too!!


You can see how yummy the Crafters workshops flower stencil on corners, I love the effect you get when you spray the smooch spritz over them too!  


I love the metal charms...Thin filigree with big brad and word plate "DREAM" just perfect 


Dusty attic products


Thanks for dropping by!
Have a great day!

Hugs 

Suzna


Entering to Dusty attic challenge: January-mood-board.


Handmade Family tree

Hi all, Today i am really excited to share with you my new creation....A Family tree.
Family Trees have a history of being very mechanical, colorless and photo-less, so i want to create something interactive and of course beautiful
All families are different. Some are small, some extended, some blended. For young children it can be very difficult to conceptualize where they fit in and how we are all connected. 
As an adult, it’s probably not often you think about your family history, let alone chat to your children about it.
Children use each of their senses to understand complex concepts, with sight at the top of the list. So I devised a craft activity using found objects from my craft room to create a visual, three-dimensional family tree. It was great fun to make this. Here i made a small family tree. I am going to show you how to make this 3D Family tree. Enjoy! And I already give you an idea, how to make steel wire tree. You can see my previous post ( click here ) 


 Made of Steel wire material
A Family Tree that has 5 photo frames, if you want more, you can add more pendant frames
Make separate branches. After all, twist together all separate twisted wires

  Add some leafs on end of branches, before twisting up to end 
 Here i used base is flat rectangle plastic one, recently we bought a toy (Honda bike) for my son. This is a stand for bike. 

  I filled with small piece of tissue papers, Prima modeling paste and Prima white sand
 After all this, gluing more metal leafs, meal frames (for holding photos), resin small flowers....and i did touch with Prima white sand on whole tree branches. After drying all i used Prima black gesso, White gesso, some shade lindy's sprays(moon shadow mist gold, yellow shade). Viva inka gold and Pima iridescent gold mica powder for the finishing touch .....For coloring flowers and leafs i used Prima mica powders(purple and teal). 

Here is some close ups  


I hope you have enjoyed this creation.
Thank you for peeking in

Decor Wire Tree

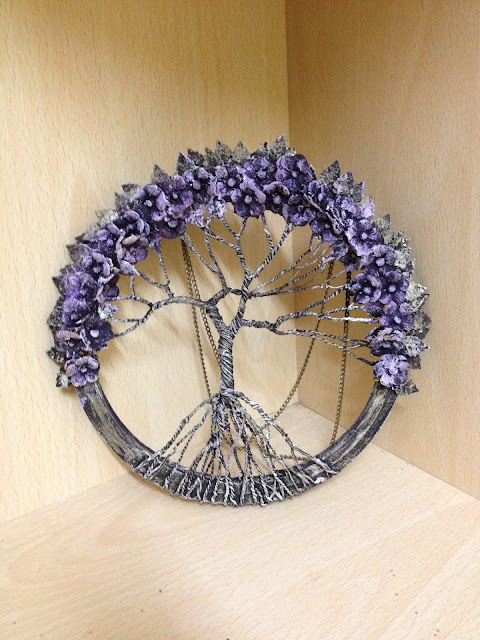
Hello all, today i am here to share with you my new Altered art on Embroidery hoop. Wall decoration. 


This is very easy project, especially for the people who they are using wire for jewelry making. Personally, I don't have much experience on these things. The tree of the photo is shown below one that I have made, almost 4yr back. but it does't look bad anyway.  


Step one: Cut the steel wires its depending on your length of tree and diameter of embroidery hoop. 


Step two: Twist the whole wire like this. and make branches and roots. Do not twist until the end.


Step three: Connect with Embroidery hoop. Use glue gun for fixing the wire on hoop.


Step four: Add decorative items on tree. Here i added small blossoms and metal leafs. You can use stone type beads too
Step five: Now its mediums section. Here i used Prima black gesso and Prima iridescent mica powders.


Here i made embroidery hoop alteration. If you want a just tree, use a single stone for root part is a good choice. You can also put your tree in a bowl with smaller stones or inside a jar. You can even make a little garden or forest. By using different materials and colors, you can create more elegant, spooky, colorful or bonsai-like trees ( cover whole with tissue and modeling texture paste). The possibilities are endless.
I hope you have enjoyed this creation. 
Thank you for stopping by 

Am Entering to following challenges

Lessolog challenge-54-candy.
RheddscreativespiritJanuary-2016-challenge.
Avenue613 Challenge 161 anything goes woptional.