Shrimmerz mixed media canvas

Hi everyone, 
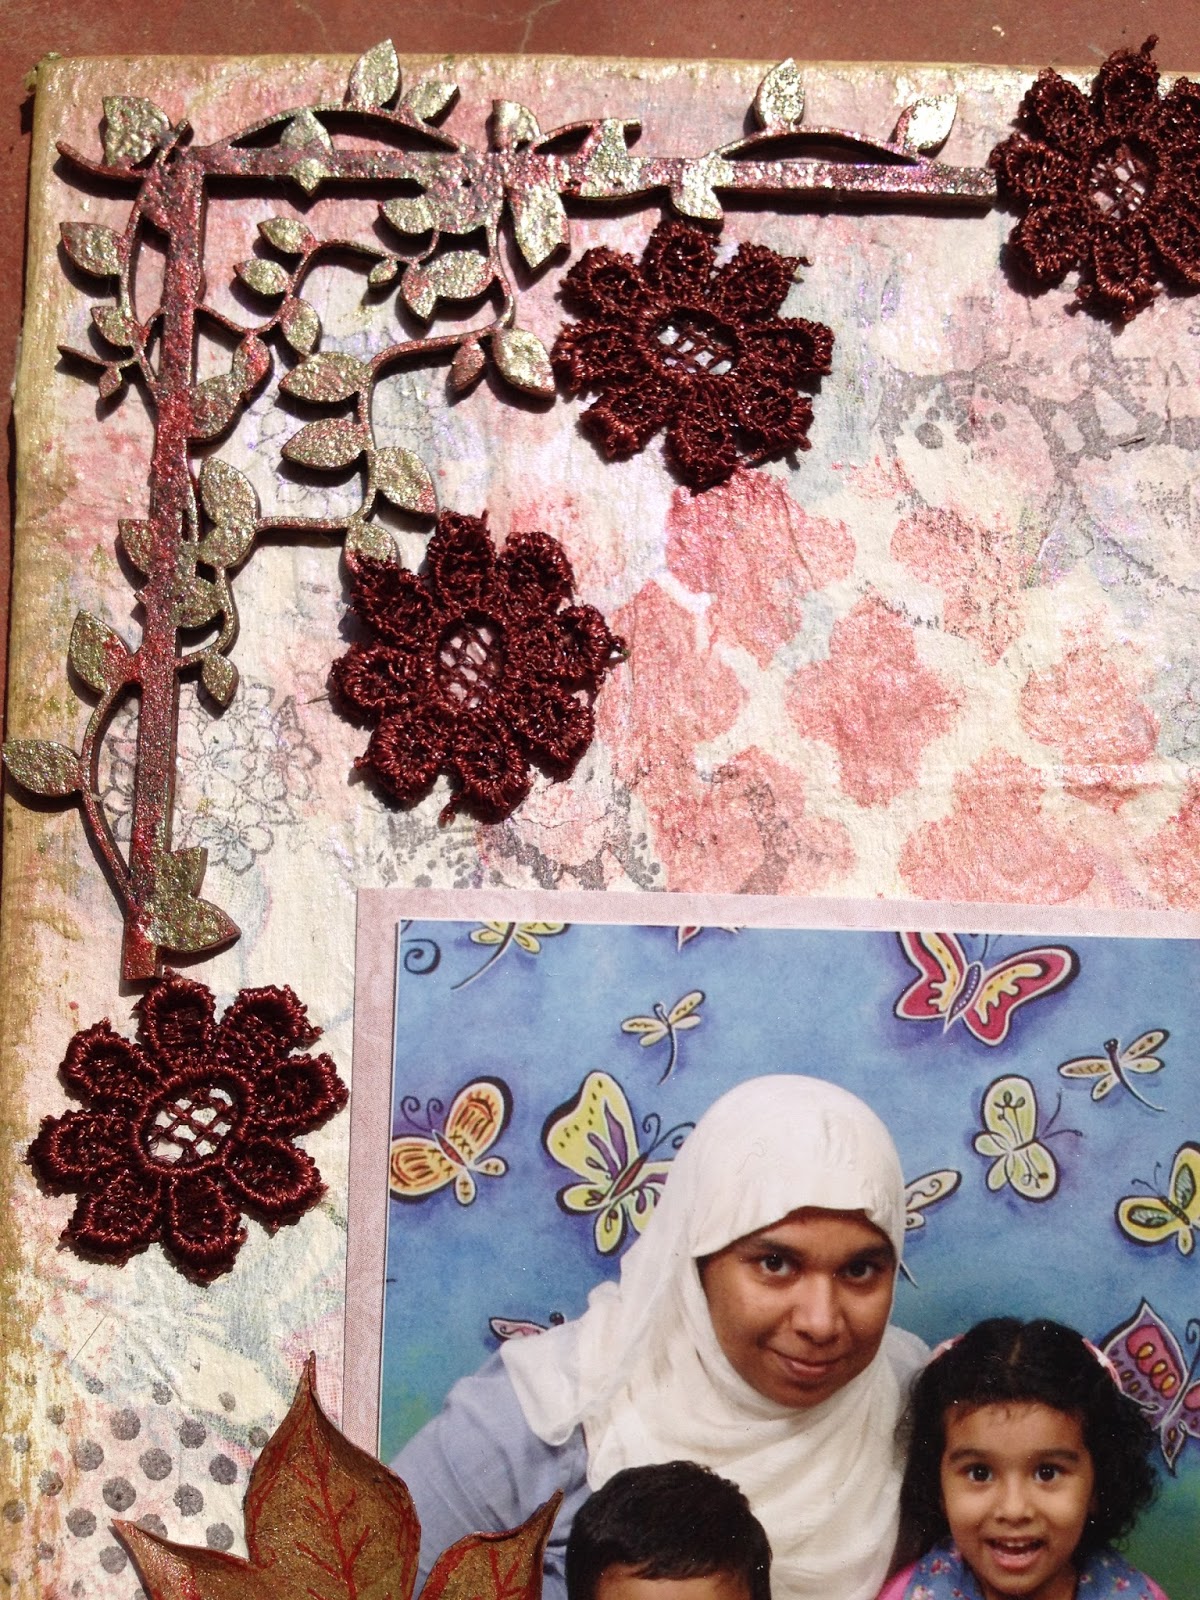
I am back with mixed media canvas to share! I just can't resist doing these Shrimmerz inspired products. And I really like their texture! I did TONS of spraying, and used Finnabair products mica powders, Gesso etc. This is the 10 X 12 canvas.


The background of this canvas is covered with texture Gesso, Stenciled textures, tissue papers and bandage cloth. I then applied several layers of black and white gesso, spray inks, shrimmerz texturs and paint! I applied chipboard elements to my canvas and Gessoed them to blend into the background.


 Dusty attic chipboard used on this project are


I hope you like my canvas! Thanks for visiting! 
 Hugs!
I am entering to following challenges - My second entry for both challenges  


Happiness

Hello friends! 
 Just sharing with you all today a page I created for Dusty attic mood board challenge and Scrap around world challenge using one of my favorite chippies from Dusty attic collection. This is an 8"x10" canvas i created and i used Prima heavy Gesso and Decorate napkin to prepare the back ground. I made few fussy cutting rose flowers from decorate napkin. I finished off my adding some cut out lace flowers, stamp image leafs and some of my favourite stamp designs.
I created this layout for my Sister, she lives in Canada. Her daughter chose a photo from the photo shoot they had done. 


Here is some close up


Dusty attic chipboard used


I hope you have been inspired in some way!  
Thank you for dropping by today :)

I am entering to following challenges  


Altered Tea Cup

 As you all may probably noticed Gabrielle Pallacco's Mixed media Nature project on canvas back. I too love the birds and nests. Here I took a tea cup saucer set and altered with you guessed it birds house.....I have seen so many beautiful ones, so i thought i should try.... even i could n't resist to making this project. I loved doing them and i wished I had more teacups. Here i used Rose flowers, dry leaves, Spanish moss and other material that I have collected through the month back. I hope to make a few more and gift them.

 1. first step is to give the cup & saucer a couple of coats of Gesso.
  2.When the coats of paint are dry, cover the whole area of the cup & saucer with a very thin layer of Mode podge using the washed out paint brush. Lay the napkin piece on whole are. It will immediately adhere to the glue (mode podge). The tip here is to work gently but quickly. Finally coat the whole of the place with a thin layer of  matt varnish Mode podge .And use the washy tap on corner side of cup & saucer.
 3. Connect the cup & saucer with strong metal wire ( melt glue stick )
4. After all decorate with stuff  


Anyway, let me know what you think and if you're going to find something to cover in Mod Podge, washy tape and Napkins.

Have a crafty week!

Entering to.


Mini Clay pot decor

Today I have an altered small clay pots that I would like to share. 
I was inspired by this month's mood board over at Dusty attic

Clay pots are the perfect for mixed media decor. Decorate your showcase with this great bird nest flower vase. You need some metallic fabric paints, Spanish moss, dry leaves, mini paper flowers, some floral ribbon and a few Dusty attic chippies. Once you make this, birds will be flying high :-).


Here i used Dusty attic chippies are


Thanks for stopping by!
Entering this to

 Dusty attic  challenges

Simple and easy gift box

Hello there! I'm super excited to be here today as the Guest Designer for " Try it on Tuesdays Challenge! " and their challenges are always Anything Goes medium. As long as you stay within the challenge theme you can make a card, altered project, ATC, scrapbook page, tag or anything your heart desires. So I sure hope you will join me in putting together something new, and here is my new simple and easy tutorial for you. I am going to show you how to make this 3D Gift Box. Enjoy! 
Sometimes the packaging that a gift comes in is an additional gift itself - and those are the kind of packages I like to create! Small boxes are great for gifting all kinds of small stuff, Can't find a gift box that you really love? Try this

1. Cut the chipboard pieces 
2. Join the 4 pieces like this 
3. Cover with Design paper, white paper and Ribbon 
4. Make rectangle open box by using A4 OMR sheet 
5. Join together  
6. Fill with your gift stuff :-) 
This is the design paper i used to decorate this gift box  

I hope you have enjoyed this creation. 
Thank you for stopping by